How to Extract Bank Statement Data into Excel with IntoExcel
A step-by-step guide to bank statement extraction: choose custom columns, use item rows, review the results and export a usable Excel table.

A PDF bank statement is useful for reading, but a spreadsheet is easier to filter and compare. To extract bank statement data into Excel with IntoExcel, upload the statement, choose the columns you need and select one row per item so each transaction can become a separate row.
This guide explains the setup in IntoExcel.com, including which fields are built in, which to create yourself and what to check before using the exported data.
1. Prepare one bank statement per file
Use a readable PDF or image with all relevant pages, visible column headings and uncropped amounts. A scan can be submitted as a PDF or image, but blurred digits still need careful review.
Keep one distinct statement per file. The current extraction flow processes only the first document when several separate documents have been combined into one upload. For multiple statements, use separate files and keep account and period information in your output.
Open the IntoExcel extraction page and upload your file.
2. Select the statement-level fields you need
Expand Bank Statement to see its fields. Opening the category does not select everything: tick individual fields or use Select all.
The built-in fields are Bank Name, Account Number, Statement Date, Opening Balance, Closing Balance and Transactions. The two balance fields use Number; the others use Text.
For a detailed transaction table, the broad Transactions field is not a substitute for separate date and amount columns. Create the specific columns below and select only the statement-level information you want repeated alongside them.
3. Create clear transaction columns
Under Create Custom Fields, enter a name, choose its kind and add the field. These are suggested custom fields, not a list of built-in bank fields:
| Suggested field name | Kind | What to request |
|---|---|---|
| Transaction date as shown | Text | The date attached to the transaction |
| Value date as shown | Text | The value date, if separately stated |
| Transaction description | Text | The transaction's wording |
| Transaction reference | Text | Its reference, preserving leading zeros |
| Debit amount as shown | Number | The outgoing amount in the debit column |
| Credit amount as shown | Number | The incoming amount in the credit column |
| Balance after transaction as shown | Number | The printed running balance, if present |
| Transaction currency | Currency | The currency established by the statement |
If your statement has a single signed amount column, use a custom Number field named “Transaction amount with the sign shown” instead of assuming separate debit and credit columns. Match the source layout and check the resulting signs.
Do not request a calculated balance as though it were printed on the statement. If the source does not provide a running balance, leave that field out or expect empty cells.
4. Choose one row per item
Before running extraction, choose one row per item. Here, an item means a bank transaction, not a product. One row per document is better for a statement summary; repeated transaction values may be combined into the same cell in that mode.
Shared values such as account number and statement date can repeat on every transaction row. Opening and closing balances are statement-level values: do not add them together across rows.
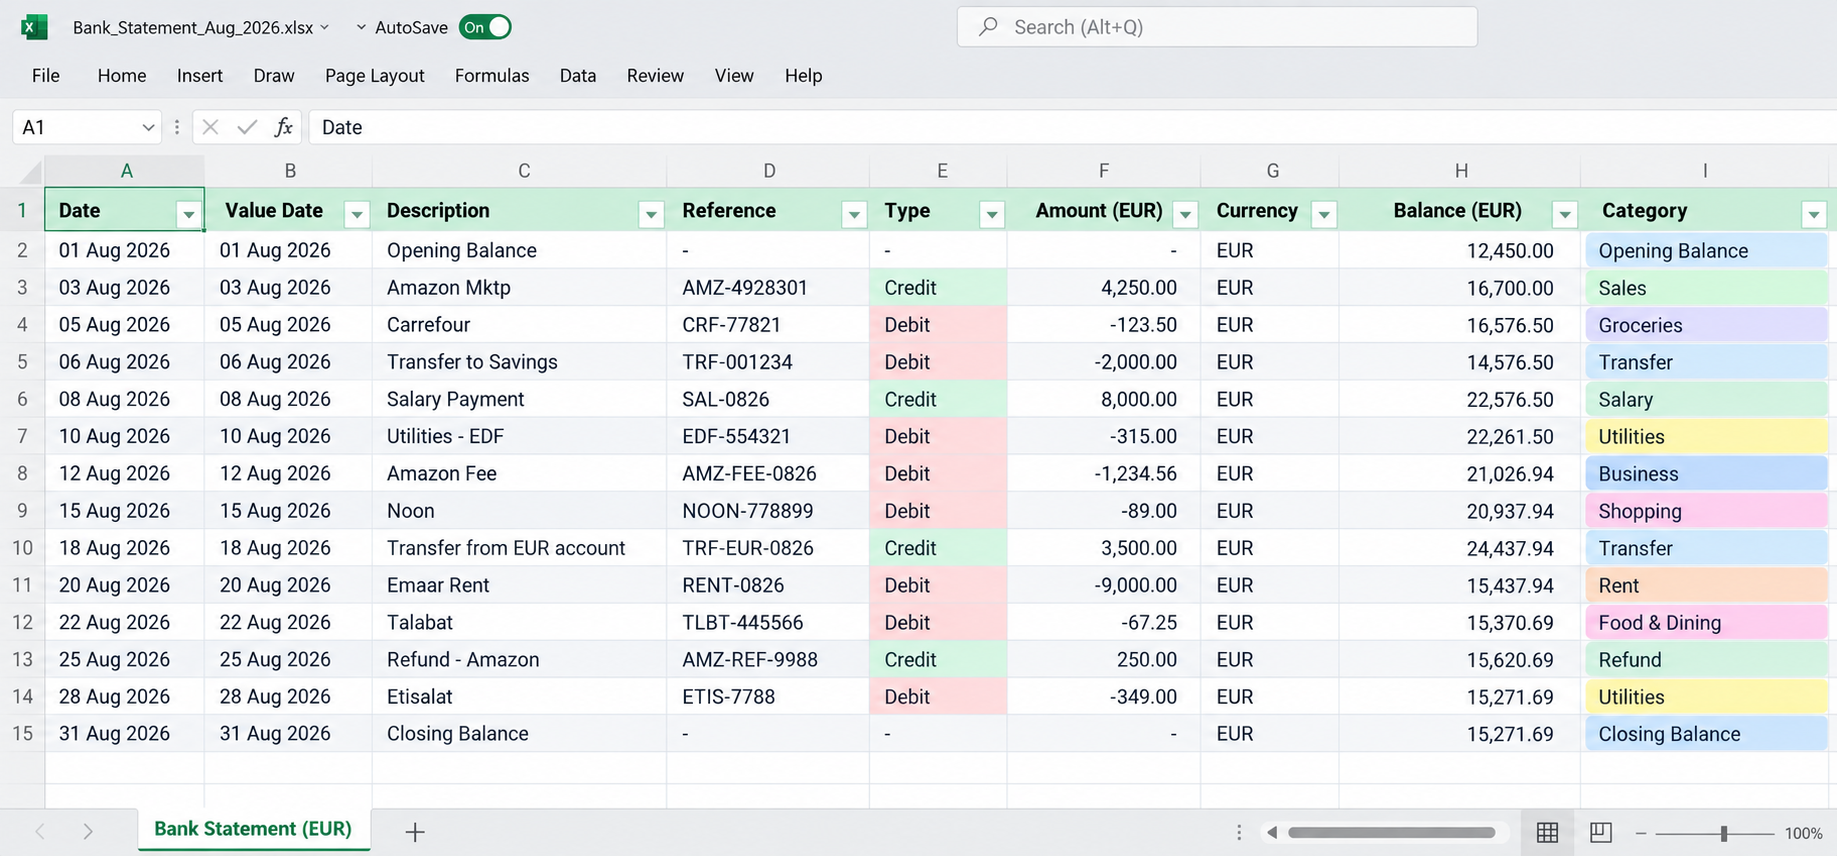
Illustrative Excel layout supplied for this guide. Categories, colors and opening/closing summary rows are presentation or review additions, not guaranteed automatic extraction output. Choose the columns appropriate to your statement; item mode targets transaction rows.
5. Extract and check the results
Run extraction, then compare the editable results with the original statement before exporting.
- Completeness: inspect the first and last transaction on each page and check for missing or repeated entries.
- Dates: distinguish transaction date from value date. Dates are exported as text; convert them deliberately in Excel if needed.
- Amounts: check decimal separators, signs and whether debit and credit have been put in the correct columns.
- Balances: compare available running balances and the statement totals. Agreement alone does not prove every description or date is correct.
- Currency and missing values: missing information gives empty cells. Ambiguous symbols may remain symbols rather than an assumed currency code.
For a hypothetical example with positive debit and credit columns: opening balance 1,000, credits 300 and debits 200 imply a closing balance of 1,100, provided all movements are included and the statement uses that convention. With a signed amount column, use the signed movements instead; do not subtract a debit twice.
The current output limit is 500 rows per file. Check any truncation notice. If you split a long statement into page ranges, check boundary transactions for omissions or duplicates. When unrelated tables make the intended items unclear, extraction can return a document summary instead; inspect that result before treating it as a transaction list.
6. Export to Excel and organize your work
Export the reviewed table to Excel. Clearly recognized numbers are stored as numeric cells, while ambiguous values can remain text and need correction. Decimal display depends on your Excel settings; do not replace punctuation across the whole workbook blindly.
You can then filter descriptions, add your own expense categories and compare payments with invoices. IntoExcel extracts the table; it does not automatically reconcile your bank account, categorize every transaction or provide a live bank connection.
Common questions
Can I extract a scanned statement?
Yes, you can submit PDFs and images. Test the readability of small amounts and faint text. AI extraction still requires review.
Does each transaction use a separate extraction credit?
No. Each successfully processed document uses one extraction in either row mode; transaction rows do not each consume a separate extraction.
What if the account number starts with zero?
Keep it as Text. The built-in Account Number field already uses that kind, and a custom reference field should do the same.
Start with a representative statement in IntoExcel.com. Once you have checked the columns and results, reuse that field selection for comparable statements and keep the originals alongside your reviewed Excel files.
Ready to try it yourself?
Stop wasting hours on manual data entry. Extract your PDF data to Excel instantly with our AI-powered tool.
Extraction